Archive 17/01/2023.

How to create transparent Overlay layer?

najak3d

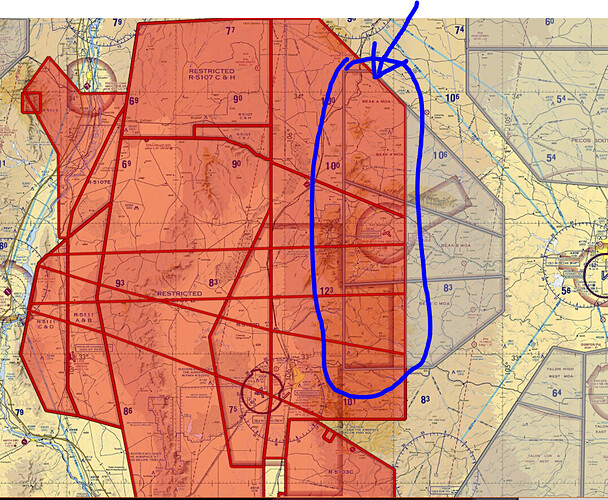
We have a map app which overlays airspaces onto a single transparent layer. The bottom layer Map is 100% opaque. The airspaces however, where they overlap, should NOT blend, but instead the last-to-render should dominate. See image included - it shows two airspaces, Gray & Red, which overlap. But as you can see the Red Layer is dominant, and so where they overlap (circled in Blue pen), the transparency is ONLY RED (and NOT a blend between Red + Gray).

To achieve this, we’ve implemented an ugly HACK. We placed a physical plane in 3D space in front of our camera, and then rendered these transparent objects to this Plane’s Texture (RTT) as 100% opaque (no blending). Then we take the resulting plane, and render it to the Main Camera, using a shader that makes it only 40% opaque.

This kludge hack is ugly/kludging. What we REALLY want is to just have a 2nd Camera that renders to an offscreen RenderBuffer, and then to render that buffer to the Main Camera using the 40% opacity shader.

We do not know how to render one Camera’s resulting RenderBuffer to another Camera directly.

(Thus we did the hack by placing a physical plane in the scene, positioned 1.866 Z units in front of the other camera… which is too kludgy, and giving us issues when Viewport size starts to change, etc).

So in short, we’d like to know how to:

  1. Have two camera in scene (one is the Main Camera, the other just renders to an offscreen Buffer).
  2. As final pass, render the 2nd camera’s Render Buffer into the Main Camera’s Render Buffer with 40% opacity.

Main thing is I don’t know how to tell the MainCamera to execute a pass like this.

SirNate0

I think the way to render the final second texture into the main camera scene would be to add a pass to the renderpath. There are a few examples of different modifications to it (for Bloom and such) that might be helpful (unfortunately I don’t do much with the render path, so I can’t really help you beyond that).

JSandusky

Add the render-target texture you use for the view as a manual resource. bool ResourceCache::AddManualResource(Resource* resource), that’ll make it available for lookup by name in your other render-paths. That’s fine as long as your needs are reasonably constrained (it’s a band-aid, not a dependency manager).

If you do have some crazy dependencies or arbitrary quantities of views then you’ll like need to clone render-paths and directly edit the textureName_[…] in the commands for whatever naming/indexing scheme you cook up.

najak3d

SirNate0 and JSandusky - thank you. Combining your two responses together is the solution we’ll be pursuing.

  1. Using PostProcessing examples, to create the added RenderPass for a “quad” shader.
  2. From the Transparency Camera, naming the RenderTexture a name that can then be used as input to the PostProcessing Shader (by name).

Our situation is just that simple - a singular Transparency layer for the whole screen. I don’t foresee it getting any more complex than that.

Now I’ve got to go get familiar with modifying the RenderPath and PostProcessing – seems like this should be easy.

Thanks!

najak3d

OK - I was able to achieve a POC success by combining the “MultipleViewport” sample with “RenderToTexture” and naming that Texture “RealTimeTransparency”, and then instead of using “Bloom” used my own shader called “TransparentOverlay” that simply combines the “viewport” texture with “RealtimeTransparency”. It works!

HOWEVER: I still have a KLUDGE, in that the RenderToTexture scene never happens UNLESS I also render that Texture into a scene to be viewed by the MainCamera (what is done with the RenderToTexture Demo, where there is a “screenObject”).

Therefore, my HACK is to include in the main scene, the following “screenNode” object. Without this code, the “RenderToTexture” never happens.

Code:
Node screenNode = CameraNode.CreateChild(“Screen”);
screenNode.Position = new Vector3(0.0f, 0.0f, 0.2f);
screenNode.Rotation = new Quaternion(-90.0f, 0.0f, 0.0f);
screenNode.Scale = new Vector3(0.000001f, 0.0f, 0.000001f);
StaticModel screenObject = screenNode.CreateComponent();
screenObject.Model = cache.GetModel(“Models/Plane.mdl”);

			Material renderMaterial = new Material();
			renderMaterial.SetTechnique(0, cache.GetTechnique("Techniques/DiffUnlit.xml"), 0, 0);
			renderMaterial.SetTexture(TextureUnit.Diffuse, renderTexture);
			screenObject.SetMaterial(renderMaterial);

===
Question: How do I force the rendering of this Offscreen Texture? (without this kludge)

Without the kludge, the RenderTexture remains blank, as my Transparency scene never renders, because Urho appear to be culling it out entirely (since it can’t tell that I’m trying to use the RenderTexture result for a MainCamera PostProcessing shader).

If needed I can keep the kludge – as I’m scaling the “screenObject” to “0.000001” size, so that it doesn’t even consume 1 pixel… Even though it’s < 1 pixel on screen, it’s still always-in-view for the MainCamera, it forces the “TransparentCamera” to render (as the Main Camera says that this “screenobject” is “in frustum” and therefore, must render).

If I remove the ScreenObject from this scene, the “TransparentCamera” (which renders to Texture) NEVER renders… and therefore, my RealTimeTransparency Texture will remain unrendered.

I hope I’m saying all of this correctly for you to understand.

In short, how to I force Urho to render the “TransparentCamera” when it’s simply rendering to a Texture, which Urho thinks is “not in use” (and therefore, does NOT bother to render it at all).

JSandusky

Default behaviour is update only when visible.

Did you set the render-surface’s update mode to SURFACE_UPDATEALWAYS? You can also use RenderSurface::QueueUpdate(...) when you need control over it (like rendering cubemaps).

najak3d

Yep, that worked. I just needed to set the TransparentLayerTexture’s RenderSurface.UpdateMode to ALWAYS. Now I don’t need the in-frustum “screenObject”. Thanks!